It really helps to have a checklist when buying a used boat. If you’re a novice boater, then a buyer’s checklist is a must have.
The checklist items that you will be inspecting are:
- Hull gelcoat/fiberglass for damage and cracking.
- Interior cushions, seats, and sidewalls for damage, cracking and mold.
- Floor for soft spots/rotting wood, stained or ripped carpet.
- Electrical for gauge functionality, corrosion, bilge, sound system, lighting, and starter.
- Engine for starting, running, cracked block, hours, oil condition, belts, and compression.
- Outdrive for oil condition, gear engagement, propeller, and impeller.
- Seal/bellows for signs of cracking and aging.
- Cables/linkage for free movement, slop, or lash.
- HIN hull identification number needs to be verified.
- Trailer for tires, bearings, bunk/rollers, frame corrosion, and brake system.
- Water test for performance, and leakage.
Inspecting A Boat Hull
This is a visual test. You are looking for anything that looks odd. Particularly you’re looking for cracks in the surface. Not only do cracks have the potential to let water in the boat, but can be an indicator that there is too much flexing at that location, and you need to know why.
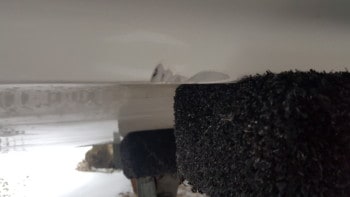 Are there any signs of chipping or gouges? These most likely happened from an impact. The boat owner may have collided with the dock or something in the water. It may have happened when trailering down the road from road debris, but either way, they’ll have to be repaired.
Be sure you’re checking topside as well. The hull is the structure of your boat and any damage or cracking is going to be a weak spot and could get worse over time.
Inspecting A Boat Interior
When a boat interior looks bad, you can get a great deal on a used boat. Many times it looks worse than it really is.
Check for areas where there’s cracking in the vinyl seat covers and the boat’s interior sidewalls. Once the material is dry cracking, there’s not much you can do, other than replace that section of material. If you have a sewing machine, you can remove the staples that hold the material to the seat frame, cut the stitches (threads only) off the bad panel, trace and cut a new piece, and sew it back on. Then just staple it back in place.
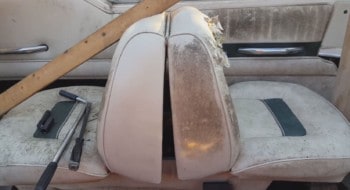 This is much the same if the material is sun burned. This is a sign that the material hasn’t been treated or protected correctly for the amount of sun exposure it has had. Just replace the bad panel.
What I see most is, dirty and moldy vinyl. Almost always, this will clean up like new. You just need the right cleaning products. Notice the sides of the back to back seats in the image. You will see where I cleaned the left side so it can be compared to the right side.
Inspecting A Boat Floor
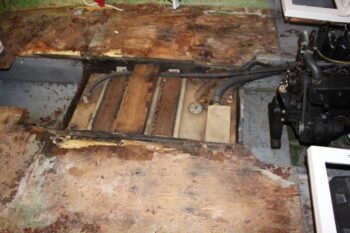 The boat floor is a big deal. It’s a big deal because it’s a Pain in the @$$ to repair properly if the damage is extensive. For deeper information on the repair process, read about Rotten Repairs.
Walk around in the boat, purposely pushing down with your toes everywhere. You’re trying to notice if there are any areas where the floor flexes down more than normal. If you hit a soft spot, and it’s pretty rotted, you may also hear the cracking plywood.
You can also do this with a thud test. Hitting all around the floor lightly with a hammer, you’ll notice a very different sound when you hit floor that’s not solid. You should also try to wiggle the seats to see if they’re making the floor move. The floor should not move if it’s good.
If you just want to begin boating, I wouldn’t mess with a boat the has a rotten floor. If you’re looking for a hobby of fixing up a boat, then read the article on Rotten Boat Floors to see what work may lie ahead. While you’re inspecting the boat floor, notice if the carpet is in good condition. If the floor is solid, replacing the carpet isn’t that big of a deal.
Inspecting A Boat’s Electrical System
You’re not necessarily trying to diagnose electrical problems, but you are looking to see if they exist. You’ll want to hook the boat up to a hose if it’s on a trailer and run the engine. You want to verify that all the gauges are functioning correctly.
Be sure to move the trim, turn on all lights and sound system, and test the bilge pump. You also want to look under the dash/helm and around battery and engine connections for corrosion and loose or burnt wires.
Be sure your parking and navigation lights work, as well as the interior courtesy lights. Be sure the radio and all speakers are working. We’ll test some of these things again in the water.
Inspecting A Boat Engine
It’s always best to do a visual inspection on the engine before starting it. This way you can comfortably touch the engine without burning yourself.
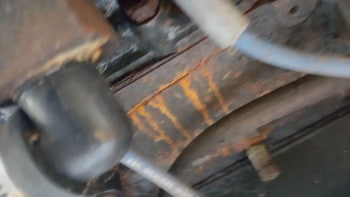 The first thing to look for is a cracked engine block. This isn’t very common, but a boat motor will sometimes run and perform well, even with a crack in the block. So lets take a look.
Oftentimes it is hard to see the engine block in boats with inboards and I/O. If you don’t have an inspection camera, then use your cell phone to make a video. Start the video and then hold the camera/phone down the sides and under the engine. Be sure to move slow and shoot at plenty of angles to capture everything.
Watch your video and be sure there are no cracks from a frozen motor. Usually you’ll see rust stains coming out of the cracks. Don’t buy a boat with a cracked engine block. If the owner was to lazy or cheap to prepare the boat for long term storage over the winter, then there will certainly be other major maintenance issues.
Check the oil to be sure it’s clean and doesn’t have any milky white look to it. The milky color indicates that there is water in the oil. This could happen from a engine block break inside, or perhaps a blown head gasket.
Check the belt and compression. Belts are replaceable, but low compression is not so easy to fix. Compression testing is a good idea, however not many people are going to actually do it. If not, pay close attention during your water testing of the boat. If there is an obvious lack of power, you may want to do a compression test anyway.
One last thing on the boat engine is to check and see if there’s an hour meter in the boat. If so notice the hours. A lot of people talk about this, but place too much weight on it. The hours on a boat motor is completely relative to how the motor has been maintained.
I have seen engines with very low hours that are pretty much junk, because they were not maintained correctly. Contrary to this, there are high hour motors that have a lot of life left in them because of good maintenance.
Inspecting A Boat’s Outdrive
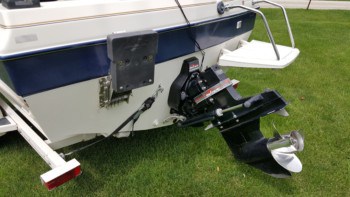 At the lower side of the outdrive, you’ll want to pull the drain plug. Be ready to put your finger over the hole quickly after removing the plug. Look at the plug itself. There is a magnet on it. Look to see if there is a large buildup of metal shavings on it. A tiny bit is normal.
Too many shavings indicates excessive wear on the gears. This can happen from a mis-adjusted shift cable, or slow engagements made by the driver over time. It could also mean that the oil was not always maintained properly. Reinstall the plug.
Shift the boat into forward (with engine off) and then turn the propeller by hand to check if it’s a solid engagement. Do the same for reverse. You’ll also want to run the boat on the hose and muffs to get an idea if the impeller is creating enough flow to cool the engine.
This isn’t always easy to tell because you have the house’s water pressure forcing water through as well. We’ll check engine temp during the water test.
Inspecting A Boat’s Seals and Bellows
Mostly this has to be done by floating the boat in the water. Without having to remove the outdrive, we can do our best to check the bellows. The bellows seals are what allows the outdrive to trim up and down as well as turn, and still keep water from entering the boat.
With the boat turned off and sitting on the trailer, trim the outdrive up to the highest position. With a good flashlight, look up from underneath between the outdrive and the transom. You will see three rubber tubes that have an accordion shape. Those three rubber boots are the bellows seals.
The lower one is the exhaust bellows. If it is cracked or broken it won’t likely leak into the boat, but we want it to be in good condition.
The one directly above it is the drive-line bellows seal. It covers the drive-line and protects the gimble bearing. If this one is bad, it’s likely you have a big problem, because it’s a major job to replace everything that gets damaged from allowing water to be in this cavity, let alone letting water into the boat.
The smaller one covers the shift cable, and again if it is damaged, it will let water into the boat. With the outdrive trimmed all the way up, do your best to reach up and feel for breaks in any of these bellows. Obviousely, you’ll try to visually inspect these seals and boots, but you can’t see all the way around them with the outdrive installed onto the boat.
Inspecting Boat Cables And Linkage
Inspecting your throttle cable, steering cable and shifting cable is important. Certainly before you take it out for a water test. Having either one of these seize up on you would be a dangerous situation.
It’s as simple as using them to see if there’s any resistance or stiffness.
- You should be able to freely turn the steering from one extreme to the other.
- Move to a full throttle position and back very smoothly with no tough spots.
- Shift from neutral to forward, back to neutral, then to reverse, easily and notice a full engagement position at each location.
You don’t want a lot of lash/slop in any of the cables. When you start to move any of the cables, they need to react instantly. If any one of these isn’t smooth and with no lash, you should consider them as needing replacement.
Inspecting The Boat HIN For Verification
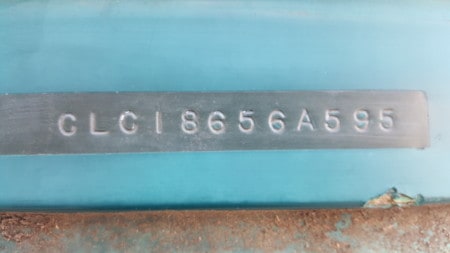 The boat HIN (Hull Identification Number) is like a VIN (Vehicle Identification Number), but in boating we identify the hull itself. This is pretty simple. We want to check the HIN against what is stated on the boat’s title.
You’ll find the HIN on the Starboard (right) side of the transom (back of the boat). Look to see if the HIN looks altered in any way. This could be a cause for concern.
A great guide to go by is my article entitled Do Boats Have VIN Numbers: Where Are They And What Do They Mean. You’ll learn how to find the manufacturer, the month and year of manufacturing, as well as the model year of the boat. You’ll also be able to pick out the boat’s serial number.
Be sure that you’re getting the boat that you are buying!
Inspecting A Boat Trailer
Before we take the boat to the water for testing, we need to be sure the trailer is safe for towing.
Inspect the tires for dry cracking, tire wear, and air pressure. It’s all too common for trailer tires to have great tread, but be completely unsafe from dry rot. Look at the tire sidewalls. That’s where you’ll see the cracking first. If the cracking is very small, it may get you to the lake and back, but just know, you need to replace them.
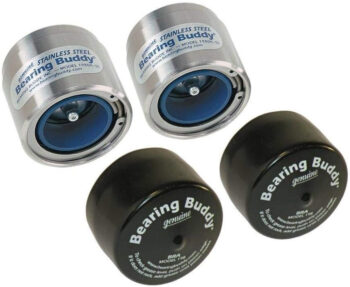 Most boat trailers have greaseable wheel bearings, often referred to as bearing buddies. There’s a special grease for submersible bearings. Usually they call it marine grease. Try moving a wheel from side to side and notice if there is any lash/slop. There should be almost no slop. It’s better to test this with the wheel in the air, but that’s not always an option.
However, you don’t want the bearings to be so tight that the wheel doesn’t stop spinning quickly after you spin it with your hand. Bearings should be tightened to just snug, then back off the nut to the first point you can insert the cotter pin. Bearings have to have the ability to slightly expand when they heat up from use.
Look for any rust that may affect the structural integrity of the trailer. Rust is usually worst at the low point of the cross-members under the center of the hull. I’ve seen these rotted out to the point where the boat sagged onto the trailer fenders.
We’ll also be checking the trailer brakes (if equipped). If you can pick up one wheel at a time with the trailer free from the vehicle, then one person can rotate a wheel and another can push on the surge brakes to see if they put resistance on the wheel from turning. (Pushing backwards on the ball hitch of the trailer will depress the surge brakes)
Hook the trailer to your vehicle. We want to know how your vehicle handles this load when you tow it to the lake for the water test. Hook up the trailer wires and verify that all lights function properly. If they don’t you may need to clean the electrical terminals where you pug into the tow vehicle’s power. If after cleaning the terminals, they all still don’t work, then you may have a faulty ground connection on the trailer. Trace the white wire and be sure it has a good ground to the trailer frame.
Water Testing A Boat
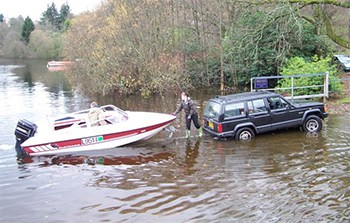
Much of your boat inspection checklist is done by now, but there are a few more things to check while the boat is in the water. When you arrive at the boat ramp, have the owner guide you back into the water after you have prepped the boat for launch (plug is installed, rear tie-downs are removed, winch is loosened or disconnected).
Once you have the boat in the water and your vehicle and trailer safely in a parking spot, look at the trailer bunks or rollers to see what condition they’re in. Take note if you notice repairs needed with the boat off the trailer. Now let the owner start the boat and get you out to a quiet, safe place on the lake, then shut off the boat.
You want to open the engine bay and any other floor access. This is the time to look and listen closely for water leaks. If there is a bad leak, you may hear the sound of running water. In this case, you are better be safe and get the boat back on the trailer quickly. If it’s small you won’t hear it but should see water in the bilge area. We’ll check it again after running the boat a bit longer as well.
This Is The Final Test
- Now it is time to fire it back up. Did it start easy?
- Put it into reverse. Is it a smooth engagement and not skipping?
- Put it in forward gear. Any chatter? (When engaging into forward or reverse, there should be a slight clunk, but not chattering or skipping sounds).
- From a complete stop position and the outdrive trimmed all the way down, engage into forward gear and then move it to full throttle quickly. Does the boat get on plane quickly?
- Any lack of power or bogging? If it can’t achive getting on plane quickly, there is likely a problem. Could be bad gas, dirty carburator/fuel system, fuel filter, spark plugs, etc.
- It should run very smooth and not reach red line on the tachometer. If it revs too high, you may need to change the propeller to the proper pitch prop. (that’s a lot of P words, lol)
- Are all gauges working properly? Every gauge on the boat is there for reason and will need to function properly.
- Does the trim hold position long term under power? ( if the trim gauge is working, adjust the trim up 1/4 of the way and run it accross the lake to see if it drops down at all. If so then you need to have the rams rebuilt or buy new ones.)
- With the trim in the proper position for cruising, power back a bit and take a full 180 degree turn each direction. Does the boat feel stable?
- Notice if there is any big flexing of the console area on either side of the boat. Too much flex and movement needs to be investigated.
- Go full speed and then pull the throttle back to neutral quickly. Let the boat come to rest and notice how the engine reacts. Does it return to idle smoothly?
- Is the engine temperature holding normal? If it is getting hot, you most likely will have to replace the impeller. It is an inexpensive part, but a pain to change.
- Go to a quiet spot and check for leaks again and see if there is water getting in the boat.
Boat Inspection Complete!
Now you know how the boat performs under full load in the water and verified that there are no leaks. It’s time to compile all your inspection checklist notes into an “opinion of value” for the boat.
Just because you may have found a few defects with this boat, doesn’t mean you shouldn’t buy it. If the boat fits your needs, and you’re capable of doing the repairs (or paying to have them done for you), then consider what that time and effort is worth to you.
The more boats you inspect using my “used boat buyer checklist”, the better your chances of finding a great used boat. This will help you to negotiate the price on a boat that you’re interested in.
One last thing to always remember:
THERE WILL ALWAYS BE ANOTHER USED BOAT FOR SALE, SO GET ONE THAT IS A GREAT DEAL THAT YOU WOULD LOVE TO OWN!

